Topics covered in this Lesson:
Line | Circle | Erase | Print | Undo
AutoCAD allows you to have access to a large number of commands. A general rule is that you will use 20% of the commands 80% of the time. I will start by introducing you to the most common drawing commands. When you combine these with the basic modify commands, you will be able to make elaborate drawings quite quickly. In other words, most of the commands you will use while using AutoCAD are taught in Level 1.
The important thing to remember is that AutoCAD will expect you give it information in a very particular order. The most frustrating thing when you begin using this program is that you will try to do something, but AutoCAD will 'not work'. In most cases, it means that you are trying to input information at the wrong time. This is why it is very important to be in the habit of looking at the command line.
The command line tells you what information AutoCAD requires to continue.
Your first drawing assignment will be to use the drawing commands in conjunction with the co-ordinate system defined in Lesson 1-1. This is a basic assignment, but it is very important to understand how to give the program accurate information. You will use the following commands:
Command
|
Keystroke
|
Icon
|
Ribbon Location
|
Result
| ||
LINE
|
Line / L
|
Home > LIne
|
Draw a straight line segment from one point to the next
| |||
CIRCLE
|
Circle / C
|
Home> Circle >
Center, Radius |
Draws a circle based on a center point and radius.
| |||
ERASE
|
Erase / E
|
Home > Erase
|
Erases an object.
| |||
ARC
| Arc / E |
Home > Arc >
Center, Start, End |
Draws an arc based on a center point and 2 endpoints
| |||
PLOT
|
Print / Plot CTRL+P
|
Quick Access Toolbar > Print
|
Enables the Print/Plot Configuration Dialog Box
| |||
UNDO
|
U / CTRL+Z
|
Quick Access Toolbar >
Undo |
Undoes the last command.
|
Assignment #1 - Drawing lines to exact points
For your first assignment, you will duplicate the drawing called Assign #1. Don't worry - I'll walk you through it step by step.
You will not have to worry about the title block or text, or dimensioning.
Make sure you are comfortable with the co-ordinate system as explained in Lesson-1-1. When you are finished this assignment, check the printed drawing with a scale ruler. All lines should measure up exactly if all went well.
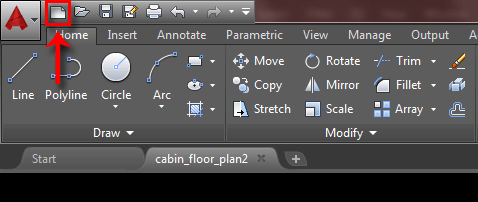
Start AutoCAD and a new drawing by pressing the NEW Icon at the top left of your AutoCAD window.

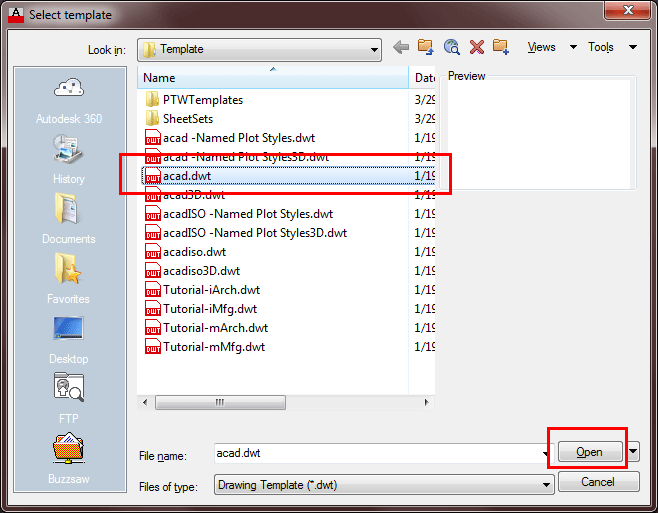
There are actually 3 ways to start a new drawing. The fastest is to press CTRL+N, but you can use the icon shown in the image above or type in the command QNEW. Any way you do this, you will see a dialog box open that asks you to select a template drawing to use (as shown below):

If AutoCAD doesn't locate your templates automatically, they can be hard to find. Have a look in your:
C:\Users\[PROFILE]\AppData\Local\Autodesk\AutoCAD 2016 - English\R20.1\enu\Template folder. You will find it there. Of course, you can also copy your templates to a folder that is easier to locate.
C:\Users\[PROFILE]\AppData\Local\Autodesk\AutoCAD 2016 - English\R20.1\enu\Template folder. You will find it there. Of course, you can also copy your templates to a folder that is easier to locate.
Select the "acad.dwt" template file and press the Open button to continue to the drawing screen.
Once there, type in Z E this will zoom into to the extents of the drawing area and make it easier to see what you are drawing (NOTE: nothing will appear to happen). Also if you find that the grid distracts you, you can press F7 to toggle it on or off.
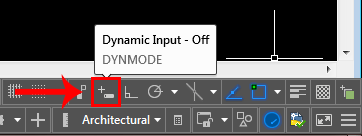
For all lessons on this level, make sure that you do not have Dynamic Input turned on. You can check this on the status bar. Make sure the DYN button isn't active. (Dynamic Input affects relative coordinates in some versions of AutoCAD.) Also, leaving Dynamic Input turned off keeps the screen clearer and easier for you to concentrate on what you are drawing.

Your status bar buttons (bottom of the screen) should like the image above with the Dynamic Input button grey.
Start the LINE command (as explained in the table above) and draw a line from 1,2 to 3,2 to 3,4 to 1,4 Press enter after each point. (*Remember to watch the command line as you do this.) For the last line, you can either type in 1,2 or C to close the line back to the first point you entered. You have just drawn a 2" square using absolute co-ordinates. Your command history (F2 key) should look like this:
Command: L LINE Specify first point: 1,2Specify next point or [Undo]: 3,2Specify next point or [Undo]: 3,4Specify next point or [Close/Undo]: 1,4Specify next point or [Close/Undo]: 1,2Specify next point or [Close/Undo]:
If you make a mistake, you can use the undo icon,  press U or press CTRL+Z.
You can also use the ERASE command to get rid of lines you don't want.
Next draw a similar box using relative co-ordinates. Start the LINE command and begin at point 4.5,2. From there draw a line two units to the right by typing @2,0 (this means 2 units in the X direction, 0 units in the Y direction based on the last point you entered). Next type @0,2 then @-2,0 then @0,-2 to finish the box. (Remember to press enter after each point.)
Now erase the last box you just drew. Start the ERASE command and then select the lines you want to erase. Then press
BREAK TIME : Take a moment to think about what you just did. You first drew lines based on ABSOLUTE points on the screen. Then you drew lines based on points RELATIVE to other points and objects. the difference is critical.
|
Draw a third box using polar co-ordinate input. Start the LINE command and begin at point 8,2 then enter. Type @1<45 b=""> to draw the first line. Next enter @1<135 b=""> then @1<225 b=""> then @1<315 b=""> (or C to close). What you have just done is drawn a line 1 unit long at 45o, then another at 135o and so on. Do the angles you entered make sense to you? If not, review it.
Start the CIRCLE command and add a circle that has a center point at 7,6 with a radius of .75 (Watch the command line for instructions).
The last thing to draw is the arc (curved line) that you see in the bottom left square. Start the ARC command and select the Center option by pressing the "C" key.
Now you can enter the center point which will be 1,2. Then you'll be prompted for the start point, enter 3.2 and finally the end point 1,4.
Command: AARC
Specify start point of arc or [Center]: C
Specify center point of arc: 1,2
Specify start point of arc: 3,2Specify end point of arc or [Angle/chord Length]: 1,4
There are many different ways to draw an arc. Try another method in the other square. Also, you'll learn later that you can draw a circle and then trim it to leave an arc. To finish the drawing, try putting a 10"x7" border around the page starting at 0,0 using the any of the methods shown above (relative, absolute or polar).
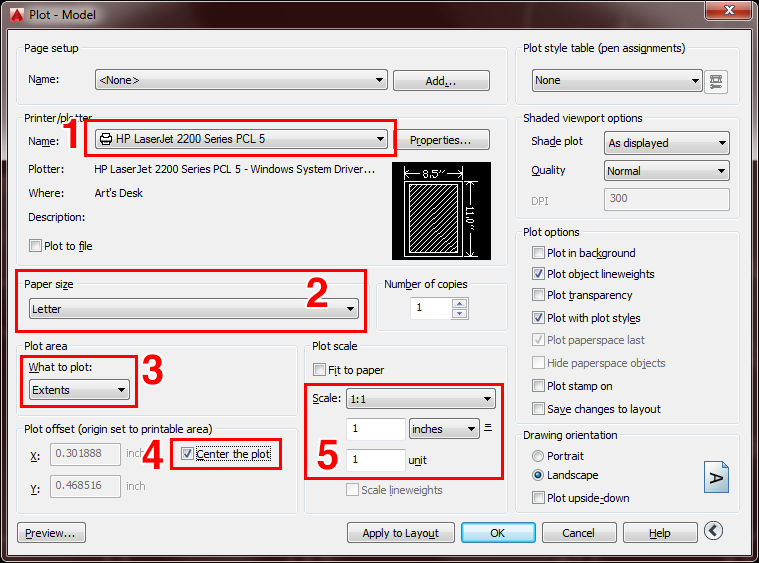
When you have done the assignment, the next step is to print (or plot) it out. To do this, bring up the plot dialog box using any method explained above (PLOT
Select your printer - laser or inkjet will work fine.Select the paper size - "Letter" ( 8-1/2" x 11") is needed in this case.For the "Plot Area", select "Extents" - that will plot everything you drew.Select the checkbox to "Center the Plot" on your sheet of paper (looks better).If "Fit to Paper" is selected by default, uncheck it and select a scale of 1 inch to 1 paper unit (1:1). This will make your printout 'life-sized'.Now Preview your drawing. I strongly recommend that you preview EVERY drawing you will ever draw in AutoCAD - a lot can go wrong, so you don't want to waste paper (especially when you're using expensive 3'x4' sheets!).If your preview looks good, Cancel out of the preview by pressing ESC.If you're sure that everything's ok (this is where good habits begin), press the OK button.

Note: You may have to change the paper size in your printer (Use the Windows printer settings to do this.) You may also have to change the rotation or origin of the plot. Check the Landscape radio button in the Drawing Orientation section.
If everything worked out, you should be able to measure your drawing and have it exactly the way you drew it (a couple of 2" squares, an angled 1" square and a 1-1/2" circle).
Video: Assignment 1
This assignment has given you a basic introduction to drawing using a variety of methods. Once you have completed the assignment, practice these methods, as you will be using them often.
Your boxes should match the drawing example. They will be the same size and on the same place in the drawing. If you have a ruler, you will see that your lines are life-size (1:1). From these basic concepts, you can now draw lines anywhere if you know where they should go. The next lessons will add to these commands. As you get used to the AutoCAD interface, you will find it easier and easier to learn the new commands. But for now, mastering the co-ordinate systems, inputting commands and reading the command line should be your priority.
Extra Practice #1
Extra Practice: Copy this drawing using the same methods as above. - Extra_001.gif
Extra Practice #2
Extra Practice: Copy this drawing using the same methods as above (all measurements needed are in the drawing) - Extra_002.gif.
this lession copy from www.mycadsite.com.


