Ad

loading...
Showing posts with label Building Materials. Show all posts

Methods of Prestressing

Methods of Prestressing

The prestressing can be performed by two methods:
  1. Pretensionong
  2. Post-Tensioning

1. Pretensioning

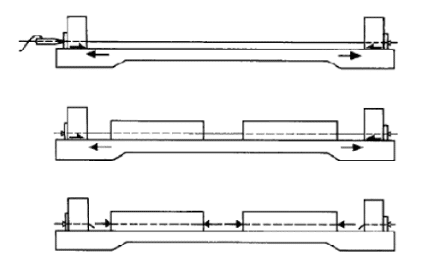
In the pretensioning method, the stress is induced by initially tensioning the steel tendons. These are wires or strands that are tensioned between the end anchorages. After this tensioning process, the concrete casting is performed.
Once the casted concrete has hardened sufficiently, the end anchorages arranged are released. This releasing transfers the prestress force to the concrete. The bond between the concrete and the steel tendons facilitates this stress transfer.
As shown in figure-2, the tendons that are protruding at the ends are cut and a finished look is achieved. In order to induce prestress force in the pre-tensioning method, a large number of tendons and wires are used. This arrangement hence demands a large area of surface contact to make the bond and stress transfer possible.
The process of Pre-tensioning

2. Post Tensioning

The procedure in post-tensioning is depicted in the figure-3 below. Here, the steel is prestressed only after the beam is cast, cured and attain strength to take the prestress. Within the sheathing, the concrete is cast. For the passage of steel cables, ducts are formed in the concrete.
The process of Post-tensioningOnce the casted concrete hardens completely, the tendons are tensioned. One end of the tendon is anchored and the other end is tensioned. In some cases, the tensioning can be performed from either side and anchored subsequently.
Once the prestressing is complete, there is space between the tendons and the duct. This leads to:
  1. Bonded Construction
  2. Unbonded Construction
1. Bonded Construction
In bonded construction, the space between the duct and the tendon is filled with cement grout. The grouting process helps the steel to resist corrosion to a large extent. The ultimate strength is increased as this method increases the resistance to live loads acting. The grout mixture is cement and water combined with or without admixture. No sand is used in this grout.
2. Unbonded Construction
If no grout is used to fill the space between the duct and tendon, it is called as unbonded construction. Here, the steel is galvanized to protect from corrosion. A waterproofing material is used for galvanizing.

What are some the common roof types?

What are some the common roof types? 

There are several types of roofs available. Some of the commonly used ones include: 

• Gable roof 
• Gambrel roof 
• Shed roof 
• Half-hipped roof 
• Dutch Hip roof 
• A-Frame roof 
• Skillion roof 
• Folded Plate roof 
• Gull wind roof 
• Bell cast roof 
• Sawtooth roof 

Describe the various types of slump test indications.

Describe the various types of slump test indications. 

Slump tests are initiated to empirically measure the consistency of fresh concrete before it sets. They can also be used to check for an improperly mixed batch of concrete as well. There are three different types of slumps that occur in slump tests listed as below: 

• True Slump 
• Shear Slump 
• Collapse Slump

In The Design Of Bridge Arguments What Considerations Should Be Made To Select The Orientation Of The Wing Walls?

Some of the most common arrangements of wing walls in cases of bridge arguments are as follows:
  • Wing walls parallel to abutments: This method is considered to take least amount of time to build and is simple as well. But on the downside this method is not the most economical. The advantage of this type of design being that they cause the least amount of disturbance to the slope embankment.
  • Wing walls at an angle to abutments: This design method is considered to be the most economical in terms of material cost.
  • Wing walls perpendicular to abutments: The characteristic of this design is it provides an alignment continuous with the bridge decks lending a support to the parapets.

What Reinforcements Are Used In The Process Of Prestressing?

The major types of reinforcements used in prestressing are:
  • Spalling Reinforcement: The spalling stresses leads to stress behind the loaded area of the anchor blocks. This results in the breaking off of the surface concrete. The most likely causes of such types of stresses are Poisson`s effects strain interoperability or by the stress trajectory shapes.
  • Equilibrium reinforcements: This type of reinforcements are required where several anchorages exist where the prestressing loads are applied in a sequential manner.
  • Bursting Reinforcements: These kinds of stresses occur in cases where the stress trajectories are concave towards the line of action of load. In order to reduce such stresses reinforcements in the form of bursting is required.

Why Are Steel Plates Inserted Inside Bearings In Elastomeric Bearings?

In order to make a elastomeric bearing act/ function as a soft spring it should be made to allow it to bulge laterally and also the stiffness compression can be increased by simply increasing the limiting amount of the lateral bulging. In many cases in order to increase the compression stiffness of the bearing the usage of metal plates is made. Once steel plates are included in the bearings the freedom of the bulge is restricted dramatically, also the deflection of the bearing is reduced as compared to a bearing without the presence of steel plates. The tensile stresses of the bearings are induced into the steel plates. But the presence of the metal plates does not affect the shear stiffness of the bearings.

Describe Briefly The Various Methods Of Concrete Curing?

Curing is the process of maintaining the moisture and temperature conditions for freshly deployed concrete. This is done for small duration of time to allow the hardening of concrete.
The methods that are involved in saving the shrinkage of the concrete includes:
  • Spraying of water: on walls, and columns can be cured by sprinkling water. 
  • Wet covering of surface: can be cured by using the surface with wet gunny bags or straw
  • Ponding: the horizontal surfaces including the slab and floors can be cured by stagnating the water.
  • Steam curing: of pre-fabricated concrete units steam can be cured by passing it over the units that are under closed chambers. It allows faster curing process and results in faster recovery. 
  • Application of curing compounds: compounds having calcium chloride can be applied on curing surface. This keeps the surface wet for a very long time.

What Are The Steps Involved In The Concreting Process, Explain?

  1. Batching: The process of measurement of the different materials for the making of concrete is known as batching. batching is usually done in two ways: volume batching and weight batching. In case of volume batching the measurement is done in the form of volume whereas in the case of weight batching it is done by the weight.
  2. Mixing: In order to create good concrete the mixing of the materials should be first done in dry condition and after it wet condition. The two general methods of mixing are: hand mixing and machine mixing.
  3. Transportation and placing of concrete: Once the concrete mixture is created it must be transported to its final location. The concrete is placed on form works and should always be dropped on its final location as closely as possible.
  4. Compaction of concrete: When concrete is placed it can have air bubbles entrapped in it which can lead to the reduction of the strength by 30%. In order to reduce the air bubbles the process of compaction is performed. Compaction is generally performed in two ways: by hand or by the use of vibrators.

Types of bridges

  • There are six main types of bridges:-
  • Arch Bridge
  • Beam Bridge
  • Cable-stayed Bridge
  • Cantilever Bridge
  • Truss Bridge
  • Suspension Bridge

Cement and History of cement

Cement

  • cement is a binder, a substance used in construction that sets and hardens and can bind other materials together.

  • The most important types of cement are used as a component in the production of mortar in masonry, and of concrete, which is a combination of cement and an aggregate to form a strong building material.

Cement History

  • Joseph Aspedin of Yorkshire (U.K.) was the first to introduce Portland cement in 1824 formed by heating a mixture of limestone and finely divided clay in a furnace to a temperature high enough to drive off the carbonic acid gas.
  • In 1845, Issac C. Johnson invented the cement by increasing the temperature at which the mixture of limestone and clay were burned to form clinker. This cement was the prototype of the modern Portland cement.
  • From then onward, a gradual improvement in the properties and qualities of cement has been made possible by researchers in U.S.A., U.K., France and Germany

Cement Clinker

Cement CompositionCement Composition

In the manufacture of Portland cementclinker occurs as lumps or nodules, usually 3 millimeters (0.12 in) to 25 millimeters (0.98 in) in diameter, produced by sintering (fused together without melting to the point of liquefaction) limestone and alumino silicate materials such as clay during the cement kiln stage.
Today cement finds extensive use in all types of construction works; in structures where high strength is required e.g. bridge piers, light houses, lofty towers, and large structures such as bridges, silos, chimneys. And also in structures exposed to the action of water, e.g. reservoirs, dams, dock yards etc. Cement mortar, concrete, reinforced brick work, artificial stones, plastering, pointing and partition walls are routinely used in buildings.

Uses of Lime

Uses of Lime

  • Lime has been used in building techniques for over 5,000 years. Archaeological evidence shows it to have been in existence for this time frame due to its resilience, durability, and water resistant qualities.
  • The Romans used lime extensively in their building program in Britain, and refined its application into mortars and plasters, which remained the principal surface finish for buildings until the nineteenth century, when cements took over this function. For this reason, many historic buildings in the UK contain large amounts of lime within their fabric
  • Also used for pointing and plastering.
pointing

Lime vs Cement

lime-vs

Lime Production

Lime Production

When limestone (calcium carbonate) is heated, at about 1000 °C it undergoes thermal decomposition. It loses carbon dioxide and turns into quicklime (calcium oxide).
lime-1
The reaction is carried out in specially constructed lime kilns(a kiln is a high temperature oven). Limestone is added at the top and quicklime is removed from the bottom in a continuous process.

Lime Cycle

lime-cycle

Lime Production

lime-production-1lime-production-2lime-production-3

Lime and types of lime

Lime : 


  • The word “lime” refers to products derived from heating limestone.
  • It originates with its earliest use as building mortar and has the sense of “sticking or adhering“
  • The rocks and minerals from which these materials are derived, typically limestone or chalk, are composed primarily of calcium carbonate (CaCO3).
Types of Lime:

  • Quick Lime (CaO)
  • Fat Lime
  • Hydraulic Lime 
  • Hydrated Lime
  • Lump Lime
  • Milk Lime

Quick Lime (CaO) :

Pure lime, generally called quick lime, is a white oxide of calcium. Much of commercial quick lime, however, contains more or less magnesium oxide, which gives the product a brownish or grayish tinge. Quick lime is obtained after the calcination of limestone. It is also called caustic lime. It is capable of slaking with water and has no affinity for carbonic acid. The specific gravity of pure lime is about 3.40.
(Calcination  is used to mean a thermal treatment process in the absence or limited supply of air or oxygen applied to ores and other solid materials to bring about a thermal decomposition. A calciner is a steel cylinder that rotates inside a heated furnace and performs indirect high-temperature processing (550-1150 °C, or 1000-2100 °F) within a controlled atmosphere.)


Fat Lime
has high calcium oxide component and, sets and hardens by the absorption of CO2 from atmosphere. These are manufactured by burning marble, white chalk, calcareous tufa, pure limestone, sea shell and coral.
Hydraulic Lime 
contains small quantities of silica, alumina, iron oxide in chemical combination with calcium oxide component. These are produced from carboniferous limestones and magnesian limestone. It has the property to set and harden under water.
Hydrated Lime
When quick lime is finely crushed, slaked with a minimum amount of water, and screened or ground to form a fine homogeneous powder the product is called hydrated lime.
Lump Lime
    is the quick-lime coming out of the kilns.
Milk Lime
    is a thin pourable solution of slaked lime in water.

Quick Lime (CaO)

Quick Lime (CaO) :

Pure lime, generally called quick lime, is a white oxide of calcium. Much of commercial quick lime, however, contains more or less magnesium oxide, which gives the product a brownish or grayish tinge. Quick lime is obtained after the calcination of limestone. It is also called caustic lime. It is capable of slaking with water and has no affinity for carbonic acid. The specific gravity of pure lime is about 3.40.
(Calcination  is used to mean a thermal treatment process in the absence or limited supply of air or oxygen applied to ores and other solid materials to bring about a thermal decomposition. A calciner is a steel cylinder that rotates inside a heated furnace and performs indirect high-temperature processing (550-1150 °C, or 1000-2100 °F) within a controlled atmosphere.)

Specifications of First class brickwork

Specifications of First class brickwork


  • All of the bricks used should be of first class.
  • See the characteristics of first class bricks .
  • Soaking of bricks should be done by submerging in a tank before use.
  • Soaking should be continue until the air bubbles are ceased.
  • Soaking should be for a period of 12 hour before use.

Mortar specifications for first class brickwork

  • Material of mortar should be of standard specifications.
  • For mortar, cement should be fresh ordinary Portland cement of standard specifications.
  • Sand should be sharp and free from organic and foreign particles.
  • If we want to make rich mortar, sand should be coarse or medium.
  • For weak mortar, local fine sand may be used.
  • Cement sand ratio of mortar should be 1:3 to 1:6 as specified.
  • To get the required proportion, materials of mortar should be measured with the measuring box.
  • Materials of mortar should be first mixed dry to have a uniform color.
  • The platform should be clean for mortar mixing.
  • Mixing should be done at least three times.
  • Then water should be added gradually for workable consistency.
  • Mortar should be freshly mixed.
  • Old mortar should not be used.
  • Mortar should be mixed with water for one hour work so that mortar may be used before setting.

Lime Surkhi mortar

  • If specified lime surkhi mortar, should be mixed in 1:2 to 1:3 ratio as specified, by grinding in mortar mill for at least three hours to use on the same day.
  • Lime should be fresh and should be screened.
  • Fresh mixed mortar should be used.
  • For small work, hand mixing may be allowed just as in the case of cement sand mortar.

Laying of first class brickwork

  • Bricks should be laid in English bond unless otherwise specified.
  • Every course of brick should be horizontal.
  • Wall should be truly in plumb.
  • Vertical joints of consecutive brick layer should not come on each other.
  • Vertical joints of alternate brick layer should come directly over one another.
  • Closers should be of clean cut bricks.
  • Closers should be placed at the end of the walls but not at the other edge.
  • Best shaped brick should be used for face work.
  • Mortar joints should not exceed 6 mm or 0.5 inch in thickness.
  • Joints should be fully filled with mortar.
  • Bricks should be laid with frogs upwards except in the top brick layer.
  • In the top course of brickwork, frog should be laid downward.
  • Brickwork should be done for 1 meter or 3 feet height at a time.
  • When one part of the wall has to be delayed then stepping should be done at an angle of 45 degree.
  • Projections where made should not be more than 1/4th of the brick in one course.
  • All joints should be raked and faces of wall should be cleaned at the end of every day’s work.

Curing of First class brickwork

  • Brickwork should be kept wet for the period of at least 10 days.
  • Top of the walls should be flooded with water at the end of the days work by making small weak mortar edging to contain at least 2.5 cm or 1 inch deep water.

Other considerations for first class brickwork

  • Brickwork should be protected from the effect of sun, rain, frost etc., during the construction.
  • Suitable Scaffolding should be provided to facilitate the construction of brickwork.
  • Scaffolding should be strong enough to withstand all the expected loads to come upon them.

Measurement of First class brickwork

  • Brickwork should be measured in cubic meter or cubic feet.
  • Different kinds of brickwork with different mortar should be taken under separate item.
  • Thickness of wall should be taken as multiple of half brick.
  • For example half brick wall thickness is taken as 10 cm or 4.5 inch.
  • Full brick wall thickness is taken as 9 inches or 20 cm and so on.
  • Rate should be for the complete work including scaffolding and all tools and plants used.

Bricks calculation formula and calculation in cubic meter

Bricks calculation formula


Bricks calculation formula is written below.

In feet

  • Length of wall in feet x height of wall in feet x thickness of wall in feet x 13.5 = number of bricks

In meter

  • length of wall in meter x height of wall in meter x thickness of wall in meter x 500 = number of bricks

 Number of bricks in 1 Cubic meter brickwork

Standard dimensions of brick in metric units are 225 x 112.5 x 75 mm.
  1. multiply these dimensions to get volume of a brick, 0.225 m x 0.1125 m x 0.075 m=0.00189 cubic meter.
  2. In one cubic meter, number of bricks will be (1/0.00189)=529.1 bricks.
  3. 10% of brickwork will be covered by mortar.
  4. Subtract 10% bricks from the 529.1, we will get 529.1-52.91=476.20 bricks.
  5. Add 5% wastage of bricks.
  6. 5% of 476.20 is 23.80 bricks.
  7. Add 23.80 and 476.20 to get number of bricks in one cubic meter brickwork.
  8. 23.80+476.20=500 bricks.

Weight of steel bars per meter – Weight of steel bars formula

Weight of steel bars per meter – Weight of steel bars formula


Diameter of bars in millimeter

Weight of bars in kilogram

6 mm0.22 kg/meter
10 mm0.62 kg/meter
12 mm0.89 kg/meter
16 mm1.58 kg/meter
20 mm2.469 kg/meter
25 mm3.858 kg/meter

Weight of steel bars formula

To calculate weight of steel bars, there is a formula used to calculate weight.
W=(D^2 x L)/162

Concrete mix ratio in Cft


Mix Material Quantities Total
(Cft)
Cement
(50kg bag)
Sand (Cft) aggregate (Cft)
Most ordinary concrete 1:2:4 1 bag 2.5 5 8.75
Foundations 1:3:6 1 bag 3.75 7.5 12.5
Rough mass concrete 1:4:8 1 bag 5 10 16.25
Watertight floors, tanks, pits,  Columns etc 1:1½:3 1 bag 1.875 3.75 6.625

Definition of premix asphalt and Types of Asphalt

Definition:

Something that is mixed or blended from two or more ingredients or elements before being used. This term is used usually for concrete in civil engineering.

Types of premix

  1. Sheet Asphalt
  2. Asphalt concrete
  3. Prime-coat
  4. Tack-coat

1. Sheet Asphalt

A premix of bitumen and sand (with or without filler) and containing coarse aggregate that exceeding 30%, laid in thickness varying from ¾" to ½" (dense carpet, stone metal is discarded and chipping limited to 30%, the rest being sand)

2. Asphaltic concrete:

A premix of bitumen and sand (with or without filler) and not less than 30% by weight of mineral aggregate of size larger than sand, mixed and laid at high temperature around 35 degree Fahrenheit and required heavy binder generally are 50-60, 60-70, 70-80, 85-100.

3. Prime Coat:

The initial application of binder to an absorbent highway surface prior to the construction of a wearing coat.

    Purpose of Prime Coat:

  1. It assist in promoting and maintaining adhesion b/w the road base and the bituminous surfacing. By pre-coating the surface of the road base and wearing coat are glued by penetrating the prime coat in the voids near the surface.
  2. It helps to bind the finer particles of aggregate together in surface of the road base.
  3. If the application of the surface is delayed for some reason it provides the road base if the application against the detrimental affect of rainfall and light traffic.

4. Tack Coat:

The initial application of binder to and existing given surface, to ensure thorough bond b/w the new construction and existing surface.
loading...